Finale & Sibelius Quick Tip : Grouping Barlines in Your Score

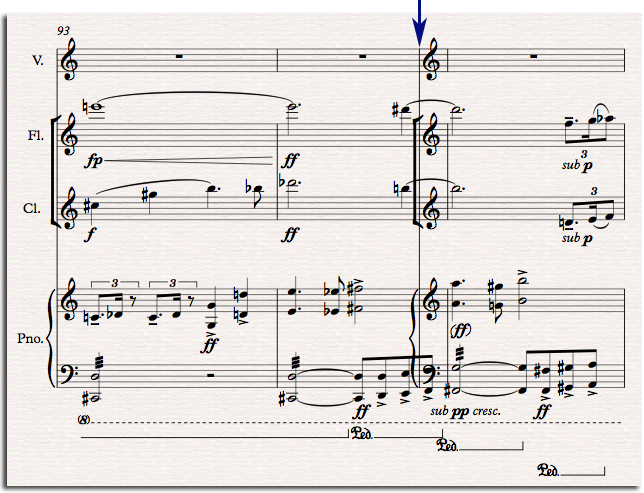
Q: I am dealing with bar lines that go through multiple parts in a score. I would like to group the instrument choirs rather than having bar lines running down the entire score. Is there an easy fix for this in Sibelius and / or  Finale?

grouped-barlines

A: Yes, absolutely.

In Sibelius, click at the bottom of the staff right at the point where the bar line joins the bottom staff line. A box will show up. Click and drag the box down and the staves will become joined or separated.

In Finale, in Staff Attributes there is an attribute called “Break Barlines between staves” which controls whether the bar lines join with the staff above that particular instrument.

That’s all there is to it.

~robert

Piano Music for Four Hands in Sibelius

In this tutorial I will show you the workflow I use to create a 4 hands piano score, and optionally, how to export a midi/audio reference.

Piano music for four hands has in general the lower part (Secondo) notated on the left hand pages, and the higher part (Primo) notated on the right hand pages. This way, the two players can easily read their own parts while following the other player’s part.

Notation template In this example I will create a basic template with 4 pages having 5 systems each, in which every system has 4 bars, what would be 20 bars on a page and a total of 80 bars on 4 pages. Later when you to enter the music, you can always add or delete bars on a page. The screenshots are all in Sibelius 6, but the principals are exactly the same for Sibelius 7.x

more >> “Piano Music for Four Hands in Sibelius”

Reposition Staves Vertically In Finale

It’s common practice to include a little extra space between groups of instruments throughout the score. It’s also common to see extra space above staves which are showing tempo or metronome marks. And finally, for vocal scores, a little extra consistent space is typically required for lyrics under vocal staves.

When creating a new score, in the Document Setup Wizard, there is an option to “Add Vertical Space”, which is great for defining a little extra space between specific staves when you are starting a project:

The actual amount of vertical space that is added here is determined by the settings in Finale’s Document Options > Staves dialog. This is also where you can control the default distance between the instrument staves themselves.

ADJUST VERTICAL POSITIONING WITH THE RESPACE STAVES DIALOG

But what if I want to adjust vertical positioning of certain staves in an existing score?

more >> “Reposition Staves Vertically In Finale”

No Frills : Straight & Simple System Brackets in Sibelius

If you’ve spent any time creating bracketed instrument groups in Sibelius, you know that Sibelius only offers only one specific bracket, with standard serifs or “hooks”, which look like this:

sibelius-default-brackets

In Sibelius, you can choose between the above bracket, a sub-bracket, or a brace, and even combine these, but there are no style options for the bracket itself, as there are in Finale, which sports a couple of additional style options for brackets (only the three options on the right are available in Sibelius):

finale-bracket-brace-options

However, a lot of modern scores use a less ornate bracket, which is just the thick vertical line without the serifs, or “hooks”. For what it’s worth, the popularity of this look is due, in no small part, to its availability in Finale.

Here are a few bars of woodwinds from Pete Anthony’s orchestration of the Opening Montage for “Spiderman 3”, composed by Christopher Young. Mr. Anthony is using Finale here. Note the simplicity of the brackets:

more >> “No Frills : Straight & Simple System Brackets in Sibelius”

Creating Big Time Signatures in Finale which include the Cut Time Symbol

Q. Do you know if there a solution to the omission of a Cut Time option in Finale’s Engraver Time font?

A. As you know, the Engraver Time font is a vertically “stretched” narrow font specifically designed to display large time signatures in scores:

finale-time-signatures-dialog

However, inexplicably, Finale doesn’t provide the Cut Time symbol in the Engraver Time font; the character slots “c” and “Shift-C” in Engraver Time have been left blank. It’s unclear why a vertically stretched Cut Time symbol was not included with the Engraver Time font.

Finale’s Document Options > Time Signatures dialog can control positioning of the abbreviated Cut Time symbol vertically separate from the regular meters. 

I have logged a feature request with MakeMusic to add the Cut Time and Common Time Symbols to the Engraver Time Font (if you would like to request this as well, refer to case #130919-000264)

In the meantime, if you also happen to own Sibelius 7, you can use the “Opus Big Time Std.” font from Sibelius which *does* have a version of Cut Time and Common Time symbols. Make sure the Cut Time option is checked in Document Options > Time Signatures.

(Hint: if you don’t own Sibelius 7, ask a friend who does to email you the Opus Big Time Std. font, or you can download the Sibelius 7 30-day free trial, which comes with all of the fonts.)

Once you install the Opus Big Time Std. font, depending on the font size you choose for your big time signatures, you will likely need to separately adjust the vertical positioning for the Abbreviated Cut Time symbol so that it appears properly related to the positioning of your regular time signatures:

finale-big-time-sig-settings

You can vertically adjust the three fields for Abbreviated Symbol, Top Symbol and Bottom Symbol to where you think they look best based on the size of your time signatures.

for Susan Pascal

Related:

  1. Finale Blog: Creating Large Time Signatures in Conductor’s Scores
  2. Finale Manual – Document Options-Time Signatures dialog box
Finale : Cross-Layer Accidental Positioning

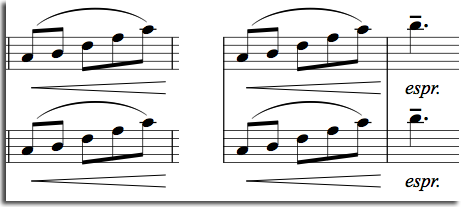
Q: In a score where two instruments share a single staff (in my example, Horn 1 and 2), I have an issue when it comes to accidentals. Here is  a picture of a printed score with an example of how this should look:

But here is Finale’s default placement:

I know that I can independently move both the accidental and the note, but I am wondering if there is a simpler method I am overlooking here?

A: In Document Options, locate the Accidentals category right at the top of the dialog, and after selecting it, look for “Use Cross-Layer Accidental Positioning”. Uncheck this option, which is on by default:

Your Finale example should now look like this:

That’s it! That’s all there is to it.

~robert

See also:

Sibelius Gap Before Bar – A Positive Feature With Negative Offsets

Q: I have a very strange Sibelius error that I can’t fix. The piece I am working on shows brackets in the middle of a system that I cannot delete without that all the brackets in the whole piece get deleted. I don’t remember how it ended up there, and I am sure I saved the file in a normal state. After opening it, though, it was like this:


Any idea what happened and how I could fix this?

A: Sibelius has a little move handle that appears when you click in a certain place just to the front of a staff:

more >> “Sibelius Gap Before Bar – A Positive Feature With Negative Offsets”